Guide to Knot Tying for Surf Fishing: 5 Essential Knots
Master the basics of surf fishing with this beginner’s guide to knot tying. Learn how to tie the Snell Knot and 4 other essential knots to ensure your tackle is secure and ready for action.
KNOT TYING
Kevin
12/25/20244 min read
Why Knot Tying is Crucial for Surf Fishing
When you’re surf fishing, having the right knot is just as important as choosing the right rod, reel, or bait. A strong, reliable knot ensures that your tackle stays secure and doesn’t fail when you’re trying to reel in that big catch. As a beginner, knowing how to tie a few key fishing knots will help you be more successful and avoid losing fish or tackle due to weak connections.
In this guide, we will walk you through five essential knots every beginner surf fisherman should know, including the Snell Knot. These knots will allow you to secure hooks, swivels, and rigs to your fishing line properly.
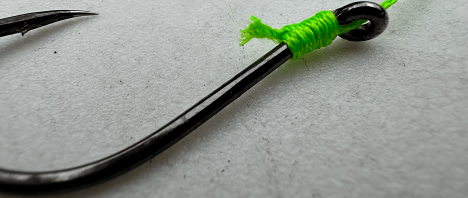
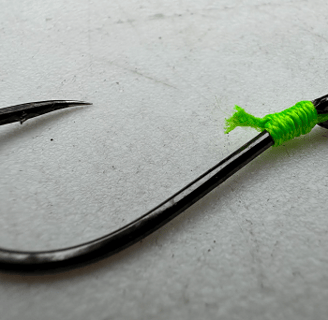
1. The Snell Knot
Why It’s Important
The Snell Knot is crucial when using circle hooks, as it helps to keep the hook aligned correctly for a better hookset. This knot allows the hook to pull into the fish’s mouth naturally, especially with live bait.
When to Use It
• Best for: Circle hooks
• Common targets: Pompano, redfish, flounder
How to Tie the Snell Knot:
1. Pass the tag end of your fishing line through the hook’s eye from the front to the back.
2. Hold the hook so that the hook’s point faces away from the main line, and the tag end runs along the shank.
3. Make 6–8 wraps around the hook shank with the tag end, moving away from the hook’s eye.
4. Pass the tag end back through the eye of the hook from the back to the front.
5. Pull on both the main line and tag end to tighten the knot, securing the hook.
Pro Tip:
The Snell Knot is perfect for live bait rigs as it allows the bait to move freely without interference.
2. The Palomar Knot
Why It’s Important
The Palomar Knot is a quick and easy knot to tie, and it’s also one of the strongest fishing knots. It’s great for securing hooks, swivels, and lures to your fishing line.
When to Use It
• Best for: Hooks, swivels, lures
• Common targets: Snook, bluefish, whiting
How to Tie the Palomar Knot:
1. Double about 6 inches of line to form a loop.
2. Pass the loop through the eye of the hook or swivel.
3. Tie an overhand knot with the doubled line, but don’t tighten it completely.
4. Pass the loop over the hook or lure.
5. Pull both the main line and the tag end to tighten the knot securely.
Pro Tip:
Always wet the line before tightening the knot to prevent friction from weakening the line.
3. The Improved Clinch Knot
Why It’s Important
The Improved Clinch Knot is one of the most commonly used knots in fishing. It’s reliable and easy to tie, and it works well for securing hooks or lures to your line.
When to Use It
• Best for: Hooks, swivels, lures
• Common targets: Pompano, whiting, trout
How to Tie the Improved Clinch Knot:
1. Pass the tag end of the line through the eye of the hook.
2. Wrap the tag end around the standing line 5–7 times.
3. Pass the tag end through the loop near the hook eye.
4. Pass the tag end through the larger loop created in step 3.
5. Pull on the main line to tighten the knot, ensuring it is firm and secure.
Pro Tip:
For thicker lines, use fewer wraps; for thinner lines, make more wraps.
4. The Dropper Loop
Why It’s Important
The Dropper Loop is essential for creating loops along your leader line where you can attach hooks. It’s a key knot for multi-hook rigs, like the double-drop rig, which can increase your chances of catching fish.
When to Use It
• Best for: Multi-hook rigs
• Common targets: Pompano, whiting, croaker
How to Tie the Dropper Loop:
1. Create a loop at the spot where you want the dropper.
2. Twist the loop around itself 5–7 times to form a series of twists.
3. Hold the loop and pull the line to form a knot.
4. Pull both ends of the line to tighten the loop and secure it in place.
Pro Tip:
Make sure the loop is large enough to fit a hook and bait without causing the line to tangle.
5. The Surgeon’s Loop
Why It’s Important
The Surgeon’s Loop is one of the easiest and quickest knots to tie, and it’s ideal for creating a strong loop at the end of your fishing line. It’s often used to attach sinkers or as part of a leader system.
When to Use It
• Best for: Attaching sinkers or leaders
• Common targets: All surf fishing species
How to Tie the Surgeon’s Loop:
1. Double your fishing line to form a loop.
2. Pass the doubled line through the loop 2–3 times.
3. Tighten the knot by pulling the standing line and tag end.
Pro Tip:
The Surgeon’s Loop is ideal for attaching a sinker or creating a loop to connect a leader, especially when fishing in the surf.
Tips for Knot Tying Success
1. Practice Makes Perfect: Knot tying can be tricky at first, but practice at home before heading to the beach.
2. Moisten Before Tightening: Wetting the line with water or saliva reduces friction, which prevents the line from weakening when you tighten the knot.
3. Inspect Your Knots: Always double-check your knots before casting to ensure they’re secure and won’t fail when you hook a fish.
4. Use Quality Line: Strong, high-quality fishing line makes knot tying easier and ensures your knots will hold.
5. Re-Tie After Big Fights: After catching a fish, always re-tie your knot to ensure it hasn’t weakened during the struggle.
Master Knot Tying for Successful Surf Fishing
By learning how to tie these five essential knots, you’ll be prepared for a wide range of surf fishing situations. From attaching hooks with the Snell Knot to securing lures with the Palomar Knot, these techniques will help you improve your success rate on the beach.
Practice these knots at home, and soon you’ll be tying them quickly and efficiently while out fishing. Strong knots make for a strong connection with the fish, so take the time to master them.
Happy surf fishing, and may your lines stay tight and your catches plentiful!